FordParts
My Garage
My Account
Cart
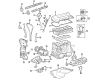
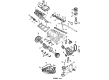
OEM Ford Ranger Engine Mount
Engine Motor Mount- Select Vehicle by Model
- Select Vehicle by VIN
Select Vehicle by Model
orMake
Model
Year
Select Vehicle by VIN
For the most accurate results, select vehicle by your VIN (Vehicle Identification Number).
42 Engine Mounts found


Ford Ranger Motor Mount, Driver Side Part Number: 1L5Z-6038-AB


Ford Ranger Mount Bracket, Driver Side Part Number: 2L5Z-6031-AA


Ford Ranger Motor Mount, Driver Side Part Number: 4L5Z-6038-BA

Ford Ranger Mount Bracket, Driver Side Part Number: E5TZ6029B


Ford Ranger Motor Mount Part Number: F47Z-6038-A


Ford Ranger Transmission Mount Part Number: 7L5Z-6068-FA
$104.20 MSRP: $151.67You Save: $47.47 (32%)
Ford Ranger Rear Mount Part Number: F1TZ-6068-A
Ford Ranger Motor Mount, Passenger Side Part Number: 3L5Z-6038-AB
Ford Ranger Motor Mount, Driver Side Part Number: 5L5Z-6038-AA
Ford Ranger Motor Mount, Passenger Side Part Number: 5L5Z-6038-AB

Ford Ranger Mount Bracket, Front Passenger Side Part Number: E5TZ6028D


Ford Ranger Front Mount Part Number: E5TZ-6038-V
Ford Ranger Motor Mount, Driver Side Part Number: F1TZ-6038-D

Ford Ranger Transmission Mount Part Number: F57Z-6068-C

Ford Ranger Mount Bracket, Driver Side Part Number: F87Z6031BA

Ford Ranger Mount Bracket, Driver Side Part Number: F87Z-6031-CA
Ford Ranger Motor Mount, Driver Side Part Number: F87Z6038FB

Ford Ranger Motor Mount, Passenger Side Part Number: F87Z6038GA
Ford Ranger Motor Mount, Driver Side Part Number: F87Z6038GB
Ford Ranger Transmission Mount Part Number: F87Z-6068-KA
| Page 1 of 3 |Next >
1-20 of 42 Results
Ford Ranger Engine Mount
OEM Engine Mount boasts unmatched quality. Each part goes through full quality checks. They adhere to Ford's official factory standards. These steps remove flaws and inconsistencies. So you can get Engine Mount with long life and a perfect fit. Come to our website and find genuine Ford Ranger parts. We keep a wide inventory of OEM Ranger parts at the highly affordable prices. It's easy to search, compare, and pick what you need. You'll love the clear info and simple checkout. We offer top-rated customer service, and we reply fast. We also ship promptly to ensure your order arrives on time.
Ford Ranger Engine Mount Parts and Q&A
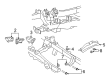
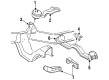
- Q: How to Remove and Replace an Engine Mount on a Four-Wheel Drive on Ford Ranger?A:Position your vehicle on a hoist at neutral before starting the removal process of the engine mount. First unplug the battery ground cable before removing the hood along with any accompanying fans. The process starts with lifting eye attachment and then moving forward with the removal of engine mount nuts. RWD vehicle owners need to detach its engine mount nut. 4WD vehicles require U-joint bearing caps to be taped in place to avoid dislodgement while index-marks should be added between the front axle pinion flange and front driveshaft. Discard all bolts alongside the straps while setting the driveshaft safely to one side. Your task is to use the right jack for front axle housing support while making it a habit to replace damaged parts after loosening any bolt, washer, spacer and flagnut present on front axle housing support. The three axle housing mounting bolts and flagnuts need removing to achieve a 50 mm (2 inches) reduction of the front axle housing support. After this step the engine mount nut and mount should be removed. Position the engine mount before installing the engine mount nut which should be tightened to 103 Nm (76 lb-ft). Secondly install the front axle housing by tightening its flagnuts and three bolts to 66 Nm (49 lb-ft). After aligning the index marks you should place replacement front driveshaft straps and tighten their bolts to 19 Nm (14 lb-ft). The RWD vehicle installation requires addition of the engine mount nut which needs to get tightened to 103 Nm (76 lb-ft). Lower the engine and remove the three-bar engine support before installing the engine mount nuts with a torque of 109 Nm (80 lb-ft). The procedure concludes by removing the lifting eyes and placing the Fan Blade before you install the hood along with reconnecting the battery ground cable.
- Q: How to service and repair the engine mount on Ford Ranger?A:Before servicing or repairing the engine mount always disable electrical power to the air suspension system through the air suspension switch to stop unexpected air spring inflation or deflation because such movements may cause vehicle shifts. Raising the vehicle to a workable height is the first step followed by loose fastener installation on the powertrain/drivetrain mount. Lower the vehicle before performing a series of movements that include shifting the vehicle forward and backward by 0.6-1.2 meters (2-4 feet) without straining the powertrain/drivetrain mounts. You should reposition the vehicle followed by repairing and bolting the powertrain/drivetrain mount fasteners into place. Finish the procedure by testing the system through a normal operation check.


Related Ford Ranger Parts
 Ford Ranger Timing Belt
 Ford Ranger Timing Chain
 Ford Ranger Timing Cover Gasket
 Ford Ranger Crankshaft Seal
 Ford Ranger Rocker Arm
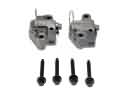 Ford Ranger Timing Chain Tensioner
 Ford Ranger Camshaft Bearing
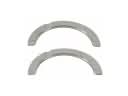 Ford Ranger Crankshaft Thrust Washer Set
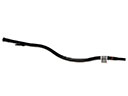 Ford Ranger Dipstick Tube
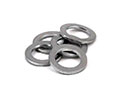 Ford Ranger Drain Plug Washer
 Ford Ranger Oil Pump Gasket
 Ford Ranger Underbody Splash Shield