FordParts
My Garage
My Account
Cart
OEM Ford Explorer Alternator
Generator- Select Vehicle by Model
- Select Vehicle by VIN
Select Vehicle by Model
orMake
Model
Year
Select Vehicle by VIN
For the most accurate results, select vehicle by your VIN (Vehicle Identification Number).
23 Alternators found


Ford Explorer Alternator Part Number: F6PZ-10346-LARM2
$188.11 MSRP: $305.45You Save: $117.34 (39%)


Ford Explorer Alternator Part Number: F6PZ-10346-EARM2
$196.32 MSRP: $325.45You Save: $129.13 (40%)Ships in 1-2 Business Days
Ford Explorer Alternator Part Number: 4U2Z-10V346-CZRM
$224.05 MSRP: $380.00You Save: $155.95 (42%)Ships in 1-2 Business Days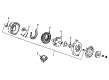
Ford Explorer Alternator Part Number: F6PZ-10346-XARM2
$127.10 MSRP: $172.53You Save: $45.43 (27%)

Ford Explorer Alternator Part Number: L1MZ-10346-E
$615.67 MSRP: $994.00You Save: $378.33 (39%)Ships in 1-3 Business Days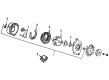
Ford Explorer Alternator Part Number: F6UZ-10346-VARM3
$183.18 MSRP: $303.64You Save: $120.46 (40%)Ships in 1-2 Business Days
Ford Explorer Alternator Part Number: 6L2Z-10346-BARM1
$179.72 MSRP: $289.09You Save: $109.37 (38%)
Ford Explorer Alternator Part Number: M1MZ-10346-A
$653.74 MSRP: $1054.00You Save: $400.26 (38%)
Ford Explorer Alternator Part Number: L1MZ-11A213-D
$379.83 MSRP: $607.27You Save: $227.44 (38%)Ships in 1-2 Business Days
Ford Explorer Alternator Part Number: G2GZ-10346-H
$404.50 MSRP: $645.45You Save: $240.95 (38%)Ships in 1-3 Business Days
Ford Explorer Alternator Part Number: 4U2Z-10V346-ELRM
$192.26 MSRP: $305.45You Save: $113.19 (38%)Ships in 1-3 Business DaysFord Explorer Alternator Part Number: L1MZ-10346-C
$526.01 MSRP: $849.09You Save: $323.08 (39%)Ships in 1-3 Business DaysFord Explorer Alternator Part Number: L1MZ-10346-B
$477.33 MSRP: $763.64You Save: $286.31 (38%)Ships in 1-3 Business Days
Ford Explorer Alternator Part Number: L1MZ-10346-A
$535.01 MSRP: $863.64You Save: $328.63 (39%)Ships in 1-3 Business Days
Ford Explorer Alternator Part Number: GB5Z-10346-B
$420.96 MSRP: $696.36You Save: $275.40 (40%)Ships in 1 Business Day
Ford Explorer Alternator Part Number: GB5Z-10346-A
$405.63 MSRP: $670.91You Save: $265.28 (40%)Ships in 1-2 Business Days

Ford Explorer Alternator Part Number: BB5Z-10346-A
Ford Explorer Alternator Part Number: 9L2Z-10346-A
Ford Explorer Alternator Part Number: 6U2Z-10V346-EFRM
$188.85 MSRP: $300.00You Save: $111.15 (38%)
Ford Explorer Alternator Part Number: 9L2Z-10346-B
| Page 1 of 2 |Next >
1-20 of 23 Results
Ford Explorer Alternator
OEM Alternator boasts unmatched quality. Each part goes through full quality checks. They adhere to Ford's official factory standards. These steps remove flaws and inconsistencies. So you can get Alternator with long life and a perfect fit. Come to our website and find genuine Ford Explorer parts. We keep a wide inventory of OEM Explorer parts at the highly affordable prices. It's easy to search, compare, and pick what you need. You'll love the clear info and simple checkout. We offer top-rated customer service, and we reply fast. We also ship promptly to ensure your order arrives on time.
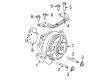
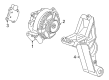
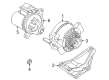
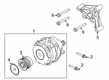
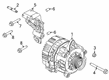
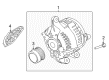
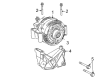
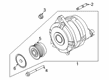
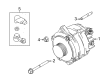
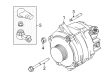
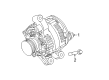
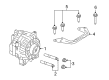
The Ford Explorer Alternator is another significant part that comes with the capacity of charging the vehicle's battery as well as powering other equipment in the vehicle while in motion. Positioned ahead of the engine, the alternator is used to change mechanical energy from the engine into AC energy and then channels this energy to the electrical consumer, the battery. With stator being fixed and rotor spinning in a rotating magnetic field, the alternator produces AC to charge the battery and electricity for further use for the car. Automatic hunting for correct voltage and having a capability to regulate voltage for avoiding under or over charging; the alternator is very much important for regulation of electricity functions of the vehicle. Also, output and high output are offered for automobiles with high electrical demand to guarantee the cars' effectiveness and durability.
Ford Explorer Alternator Parts and Q&A
- Q: How to service and repair the alternator on a 4.0L SOHC generator on Ford Explorer?A:Service and repair operations for a 4.0L SOHC generator start with disconnecting the power source from the battery. The Front End Accessory Drive (FEAD) tensioner should be rotated counterclockwise before setting the FEAD belt to the side. Take away the protective cover then uninstall and discard the generator B+ terminal nut and retighten the new nut to 17 Nm (150 lb-in) when installing it. You should disconnect the B+ terminal from the generator then detach both electrical connectors before uninstalling the bolts which need to be tightened to 35 lb-ft (47 Nm) when reinstallation begins. Follow the procedure to remove the generator pulley nut then reinstall it with a torque of 109 Nm (80 lb-ft). Takedown the generator cap and nut followed by placing the radial adapter in a safe location and tighten this component to 11 Nm (97 lb-in) before reinstalling it. During reinstallation use the reverse procedures to replace the generator B+ terminal nut.