FordParts
My Garage
My Account
Cart
OEM 2009 Ford Edge Windshield
Glass Windshield- Select Vehicle by Model
- Select Vehicle by VIN
Select Vehicle by Model
orMake
Model
Year
Select Vehicle by VIN
For the most accurate results, select vehicle by your VIN (Vehicle Identification Number).
1 Windshield found

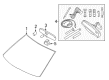
2009 Ford Edge Windshield, Front Part Number: 7T4Z-7803100-A
$221.15 MSRP: $324.75You Save: $103.60 (32%)Product Specifications- Other Name: Glass - Windscreen; Windshield, Front
- Manufacturer Note: Includes Weatherstrip
- Position: Front
- Base No.: <03100
- Condition: New
- Fitment Type: Direct Replacement
- SKU: 7T4Z-7803100-A
- Warranty: This genuine part is guaranteed by Ford's factory warranty.
2009 Ford Edge Windshield
If you're seeking quality and affordability, look no further than our extensive inventory of genuine 2009 Ford Edge Windshield available at FordPartsDeal.com. You can confidently purchase our OEM 2009 Ford Edge Windshield as they are supported by the manufacturer's warranty and our hassle-free return policy, alongside the benefit of our fast delivery service.
2009 Ford Edge Windshield Parts Q&A
- Q: How to service and repair a windshield on 2009 Ford Edge?A: The service process of a windshield starts by removing the A-pillar trim panels together with sun visors and clips and interior mirror. Lower half of the headliner which overlaps the windshield header should be partially lowered while blocking that area with suitable materials. Before work begins on the cowl panel grille always wear protective eye gear and gloves because the procedure includes potential hazards. When removing the glass you should avoid scratching the paint or primer of the pinch weld to stop rust development. Put the tool's blade into the Deluxe Windshield Removal Tool flat against the glass surface but allow the urethane adhesive to stay on the pinch weld for replacement windshield dry fitting. The pre-existing adhesive needs water lubrication before performing the cutting procedure. Two technicians should perform this job simultaneously. Cut the urethane adhesive using Deluxe Windshield Removal Tool positioned at the top center and aiming toward the bottom corners before removing windshield glass from the body by first using The Pumper. The installation should begin by fitting the windshield glass dry onto the existing urethane adhesive bead found on the body pinch weld while utilizing the two alignment pins for correct positioning and marking with non-permanent pencil. Repair all corrosion found on the pinch weld which serves as a structural element by removing the windshield glass. Before conducting any repairs to the pinch weld one must follow manufacturer guidelines which require the use of pinch weld primer and glass primer and urethane adhesive from the same manufacturer. Cut the adhesive to every surface of cut with a 1 mm (0.04 in) to 2 mm (0.08 in) base remaining on the pinch weld before cleaning all visible debris from the area. The original windshield glass can be reused only if technicians first remove excess urethane adhesive before cleaning its inside surface with glass cleaner. Glass primer should be used according to its manufacturer instructions before drying for at least 6 minutes. Use a high ratio caulk gun of either electric or battery-operated type to apply continuous urethane adhesive on the trimmed adhesive bead while starting and ending the application at the bottom center of the windshield. Drive the vehicle only after the urethane adhesive seal meets cure completion requirements specified by the manufacturer to retain glass position. The installer should open windshield windows before setting the glass to stop air pressure from damaging the adhesive bond. Secure the windshield glass through its alignment pins then adhesive beads before allowing a minimum one-hour urethane adhesive curing time for air and water leak tests. Proceed by examining the seal while applying urethane adhesive where needed before putting back the cowl panel grille alongside the headliner and interior mirror, sun visors with their clips, and the A-pillar trim panels.
Related 2009 Ford Edge Parts
 2009 Ford Edge Windshield Wiper
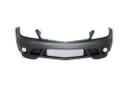 2009 Ford Edge Bumper
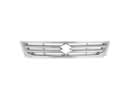 2009 Ford Edge Grille
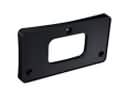 2009 Ford Edge License Plate
 2009 Ford Edge Windshield Washer Nozzle
 2009 Ford Edge Wiper Arm
 2009 Ford Edge Car Mirror
 2009 Ford Edge Car Speakers
 2009 Ford Edge Washer Pump
 2009 Ford Edge Washer Reservoir
 2009 Ford Edge Wiper Blade
 2009 Ford Edge Wiper Motor